Pinhole Photography!
The idea of the pinhole camera dates back to as far as 5th Century BC, when a Chinese philosopher questioned the way the light shone through wicker work. However, the first actual pinhole camera was created in 1544 by a German physicist and mathematician named Gemma Frisius and it wasn't a box, it was in fact a room, used to observe the solar eclipse. The first actual photo taken from a pinhole camera was in 1850 by a Scottish scientist called Sir David Brewster, but it wasn't until the 1960s that it became a recognised way of taking photos.
Cameras have slowly advanced after this, in 1905, an English inventor came up with the idea of using a smaller film and then enlarging the image after development. This lead to the 35mm cameras. After this was instant or polaroid photos which were first invented in 1948, and then disposable cameras in 1986. The first digital camera was 1984.
To make my pinhole camera, I bought in a small cardboard teabag box with a lid and cut a hole in the top. Then, I painted the inside of the box matte black to eliminate all light. Then I taped a piece of foil across the hole to act as a camera lens. Then I made a pin hole in the foil, and made a flap to cover the pin hole that I could release when I wanted to expose to take a picture. Finally I cut a piece of photographic paper to fit the camera under safe light in the darkroom, and that was the camera done.

To take the photos, I went outside and placed my camera in the position I wanted, before exposing the pinhole for 3 minutes, a time which I calculated by measuring the distance between the hole and the photo paper, and the diameter of the pinhole, and then dividing the width by the diameter, to get the amount of F-stops.
f-stop = 140/0.8 = f175. Which is 15 minutes of exposure inside, and 3 minutes outside, because of the amount of light needed.
I tried to take a photo several times, but when I developed my photos, they just came out black. I concluded that my camera wasn't working, and somehow the light was getting in because of the flimsy cardboard that I'd used to make the camera. So I had to use another camera, a tin one, which was much more secure. so I headed outside again and attempted once more. I then went back inside and developed my photograph, and it had finally worked.

And this is what I got; a negative image of the scene that could be viewed from the pinhole in the position I placed my camera. I chose to photograph this place in particular because I liked the arches and the brickwork, and also the small piece of graffiti to the right.
I then Had a go at taking a photo inside, with my new camera which worked fine. I left it for about 5 minutes before taking it in for development, and this is what I got;

The view of some photography equipment by a window. I chose this because of the good contrast the cameras had against the light coming from the window, and specifically the detail in the stands and wires included in the equipment.
To develop the photos I used the darkroom, and worked under the safe light. I used tongs to place the photographic paper shiny side up into the 'developer' solution, and waited for 30 seconds. The image slowly appeared onto the paper. I then took it out of the developer solution and rinsed it with water, before putting it in the 'fixer' solution, for a further 5 minutes. This is to stop the photo from developing any further. Then I was able to take the photo out and put it through the drier to see the 'almost' finished product.
To finally see my pictures as they were supposed to be viewed, I had to scan them and then invert them on Photoshop. I used the photocopier scanner and then sent the image to my computer via my student email, before opening it on Photoshop. At first I cropped it to get rid of the excess white around the image, before using the 'invert' function. The alternate way to have done this would have been to use the scanner which was connected directly to the scanner. This allows me to import the scanned photo directly to photoshop without having to send it and import it via my email.

And this is what I got. Obviously it's not perfect, possibly due to the camera not being perfect and therefore either too much, or not enough light getting in. But overall it's not that bad, I believe that the slightly imperfect feeling of the picture gives it a certain mood, which compliments it somewhat.
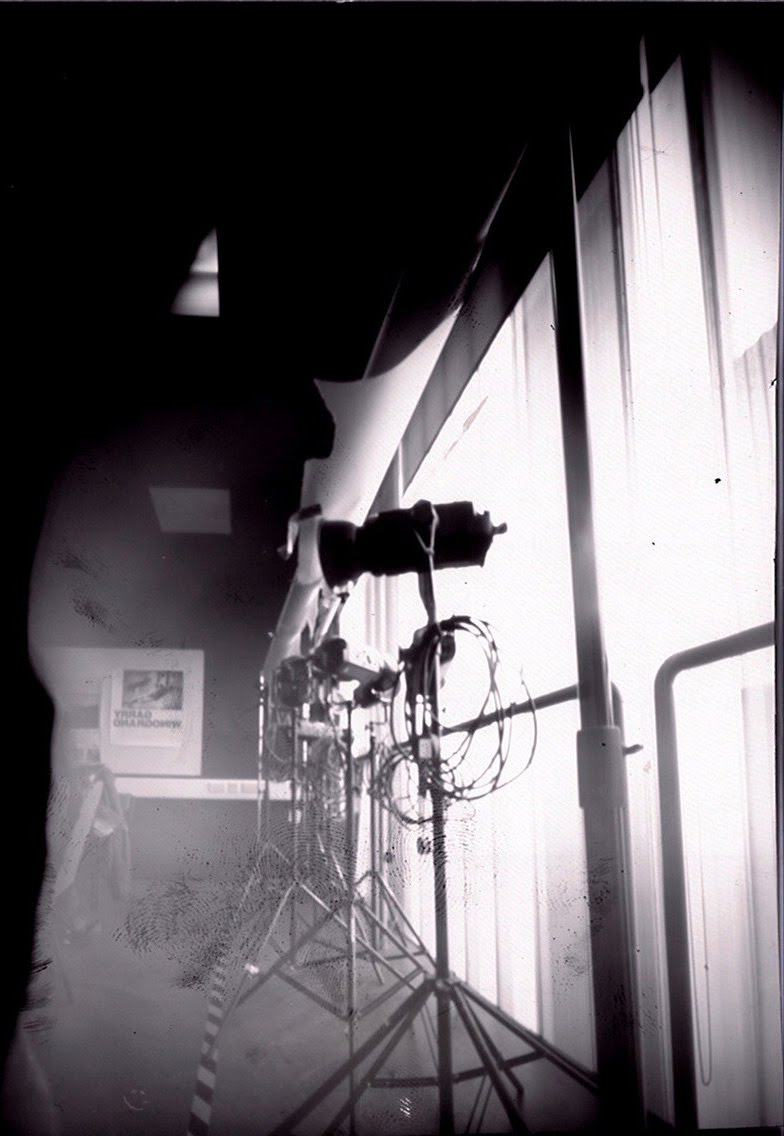
This is my inside picture which also turned out alright, but not exactly perfect. It has a fingerprint on it, but there is quite a lot of detail which looks good. It's a shame about the large amounts of black around the left side, and although it could be cropped out, doing so would also remove a lot of the detail and it would possibly loose it's old, authentic feel.
The last photo I took didn't turn out well at all, it was under exposed. After development I could tell it wouldn't turn out well because the majority of it was white, which meant that when I inverted it, most of it would be dark and so it would not be a very good photo.

It's the inside of the college and the lines and dots which can be seen are the different floors of the college and the lights, which particularly stand out because less exposure is needed to pick them up.
After this I did some research on other people's pinhole photography so I said something to compare mine to. I found that a lot of people had obviously taken a lot longer to work out the number of F-Stops and the exposure time, and also the size of the photo paper, to make their photos neat. I also wrote about which things i liked about the photos and why I chose to study them.


(Source)

(Source)
to conclude my first post, i believe that my pinhole photographs turned out reasonably well, considering it was my first go. I learned that cardboard is not the best for creating pinhole cameras as it is flimsy and unreliable compared to tin, which is what I used to produce my best work. I also learned that it is important to calculate the exposure time and F-stops, because otherwise the outcome is an under or over exposed photo. I'm pleased with my overall outcome.
Websites used; (Source) (Source)